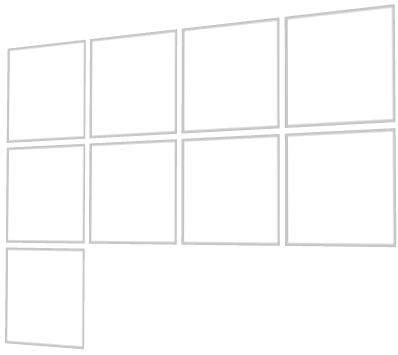
Use the Flow Layout nodes to arrange nodes along a line. When a line runs out of space, the Flow Layout node places its child nodes in a new line. You can use a Flow Layout node to arrange content in the same way you would arrange it on a page.
Flow Layout node iterates through its child nodes in the order you add them and first arranges items along the line set in the Primary Direction property. When a Flow Layout node runs out of available space in the direction set by the Primary Direction property, it creates a new line along the direction you set in the Secondary Direction property. See Setting the direction of a Flow Layout node.
You can set the direction and the starting point for arranging Flow Layout 3D child nodes on x, y, and z axes, and Flow Layout 2D child nodes on x and y axes.
To create a Flow Layout node:
(Optional) To clear the area around child nodes in a layout, in the Project select child nodes in the layout, in the Properties click  , and add and set the margin properties:
For a Flow Layout node you can set both the starting point and the direction in which the Flow Layout node arranges its child nodes.
To set the direction of a Flow Layout node:
For example, to arrange items in a flow layout according to the rules used in:
Use brushes to set the background of 2D nodes. In Kanzi all 2D nodes by default have transparent background.
To set the background:
 , add the Background Brush property, and select the brush you created in the first step.
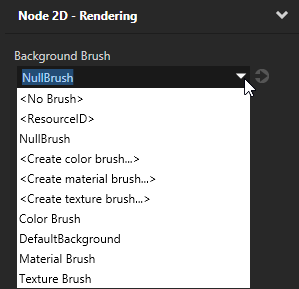
To create a Flow Layout 3D object:
// Create a Flow Layout 3D object named Flow. The default primary direction is
// left to right and secondary direction top to bottom.
FlowLayout3DSharedPtr flow = FlowLayout3D::create(domain, "Flow");
To set the width of a flow layout:
// Set the width of the flow layout to 6 device independent pixels to
// limit its size in its primary direction. By limiting the size in
// the primary direction you force it to create a new line in
// the secondary direction, when it cannot fit an item in the primary direction.
flow->setWidth(6.0f);
To add items to a flow layout:
// Flow Layout 3D arranges its items in the order you add them.
// Create a 3D object ...
Model3DSharedPtr item1 = Model3D::createBox(domain, "item1", 2.0f, 1.0f, 1.0f, KanziThemeRed);
// ... and add it to the flow layout.
flow->addChild(item1);
// The second item still fits in the first line.
Model3DSharedPtr item2 = Model3D::createBox(domain, "item2", 3.0f, 1.0f, 1.0f, KanziThemeGreen);
flow->addChild(item2);
// There is still space in the first line, but the third item is
// too large to fit, so flow layout creates a new line.
Model3DSharedPtr item3 = Model3D::createBox(domain, "item3", 5.0f, 1.0f, 1.0f, KanziThemeBlue);
flow->addChild(item3);
// The fourth item fits in the second line by leaving no empty space.
Model3DSharedPtr item4 = Model3D::createBox(domain, "item4", 1.0f, 1.0f, 1.0f, KanziThemeOrange);
flow->addChild(item4);
// Flow layout places the last item in a new line.
Model3DSharedPtr item5 = Model3D::createBox(domain, "item5", 3.0f, 1.0f, 1.0f, KanziThemeGreen);
flow->addChild(item5);
For details, see the API reference.
To create a Flow Layout 3D object:
// Create a Flow Layout 2D object named Flow. The default primary direction is
// left to right and secondary direction top to bottom.
FlowLayout2DSharedPtr flow = FlowLayout2D::create(domain, "Flow");
To set the width of a flow layout:
// Set the width of the flow layout to 600 pixels to limit its size in its
// primary direction. By limiting the size in the primary direction you force
// it to create a new line in the secondary direction, when it cannot fit
// an item in the primary direction.
flow->setWidth(600.0f);
To add items to a flow layout:
// Flow Layout 2D arranges its items in the order you add them.
// Create a 2D object ...
EmptyNode2DSharedPtr item1 = EmptyNode2D::create(domain, "item1", 200.0f, 200.0f, KanziThemeRed);
// ... and add it to the flow layout.
flow->addChild(item1);
// The second item still fits in the first line.
EmptyNode2DSharedPtr item2 = EmptyNode2D::create(domain, "item2", 250.0f, 250.0f, KanziThemeBlue);
flow->addChild(item2);
// There is still space in the first line, but the third item is
// too large to fit, so flow layout creates a new line.
EmptyNode2DSharedPtr item3 = EmptyNode2D::create(domain, "item3", 200.0f, 200.0f, KanziThemeGreen);
flow->addChild(item3);
// The fourth item fits in the second line by leaving no empty space.
EmptyNode2DSharedPtr item4 = EmptyNode2D::create(domain, "item4", 400.0f, 400.0f, KanziThemeOrange);
flow->addChild(item4);
// Flow layout places the last item in a new line.
EmptyNode2DSharedPtr item5 = EmptyNode2D::create(domain, "item5", 150.0f, 150.0f, KanziThemeRed);
flow->addChild(item5);
For details, see the API reference.
Using the Trajectory Layout nodes
